
How to take and share 360 photos and videos
You’ve got your new camera. You’re ready to go full 360. Now what? Here’s some tips to get you started. New to 360 cameras? Not sure what to do next? Here’s a few tips and tricks to get you started.

You’ve got your new camera. You’re ready to go full 360. Now what? Here’s some tips to get you started.
After hearing all the buzz about 360 photos and why they’re the next big thing in capturing memories, you took the plunge — you got your 360 camera and you’re ready to start making, preserving, and sharing the moments that matter in your life.
But 360 cameras are different enough that you’ll need to readjust your habits and way of thinking around taking photos. Of course, after a little bit of practice and experimentation, you’ll get the hang of it and begin capturing moments that were impossible to get before. Here are a few tips to get you started.
Get to know your camera — and its accompanying app
- First, get to know your 360 camera. How do you take photos vs. videos? Because there’s no viewfinder, it’s important to figure out how to tell if you’re shooting photo or video, and if it’s on or off. That way you’ll avoid the realization later that your video starts with everyone clapping after the song, instead of during the singing of “Happy Birthday” (we speak from experience).
- Almost every 360 camera has an accompanying smartphone app that serves both as a viewfinder/remote, settings manager, and download client. It’s worth figuring out how to get it working — if only to turn down the obnoxiously loud fake shutter sounds.
Get used to shooting in 360: Capture a variety of moments and scenes
- Shooting a 360 photo is very different than snapping photos on your smartphone. So try it in a variety of situations — you’ll be pleasantly surprised by the results. And get used to being in most of your photos: the real magic of the 360 format comes from realizing that you don’t need to hit pause on a moment to frame the shot or sneak into a selfie (though you can use tripods and selfie sticks for different types of shots).
- Get comfortable with shooting 360s without being able to see the results immediately. This frees you up to concentrate on just capturing the right moment — and with a 360 camera, you no longer have to put anything up to your face. For parents, this is especially great since you no longer have to choose between documenting a moment or participating.
Learn how to download photos/videos from camera to computer
- Although your camera’s smartphone app will claim to be able to download photos and videos over Bluetooth or Wifi, you’ll spend all your time (and battery) waiting for these transfers to finish, which is why you’ll want to download photos onto your laptop or desktop computer (see below). And if you’re shooting video, downloading directly to your computer is required since there’s often an additional stitching step.
- If you have a camera like the Ricoh Theta that doesn’t have removable storage, you’ll need to pull the images off the device yourself anyway. On Mac OS X, our favorite app is Image Capture, which is a utility on every Mac. Windows computers usually recognize cameras as external storage, so you can copy photos like files.
View your photos in 360 (and virtual reality)
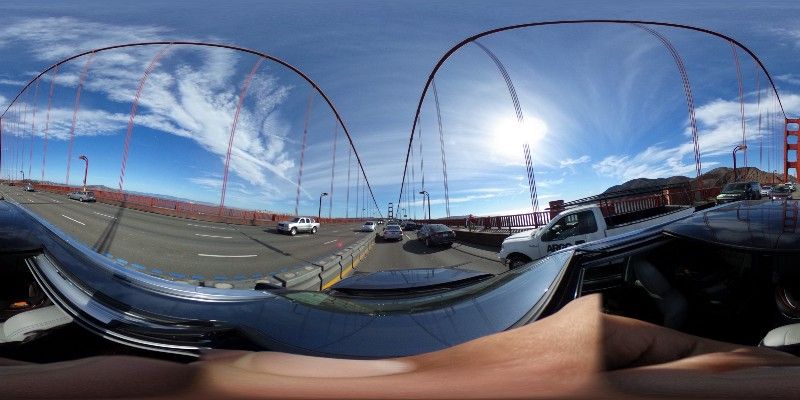
Now it’s time to see what you captured! We’re so used to being able to view our photos on our smartphones or computers, but you’ll find some issues using the conventional tools. The biggest one is that your 360 photos will look distorted, like this:
This is where a service built specifically for viewing 360 photos, like Momento360, is useful (Google Photos also does this). By rendering the 360 correctly, you can look around your scene and make sure you captured what you wanted (and left out what you didn’t want):
Bonus: To really grasp why 360 photos are unlike anything before, view your photos with a virtual reality device. Don’t have one? The starter-level Google Cardboard viewer is just $15. Momento360 and Oculus/Facebook are services that support viewing your photos/videos on various VR clients.
Share with your family and friends
- Now that you’ve decided which of your shots turned out the way you like, you’ll want to share them with family and friends. Momento360 is designed for limited or private sharing (important for photos of your children); all your loved ones need to view the images in all their 360 glory is a computer or smartphone.
- If you want to share more publicly or add them to your social media feed, you can also post to Facebook (photos and videos) or YouTube (360 videos); both have solid support for 360 content across their multiple platforms.
And if you have a particularly inspired 360 photo or video that you’d like to share with the world, you can submit it to the Momento360 Gallery (coming soon).
Momento360 is a free way to upload, view, share, and discuss your 360 memories with family and friends.